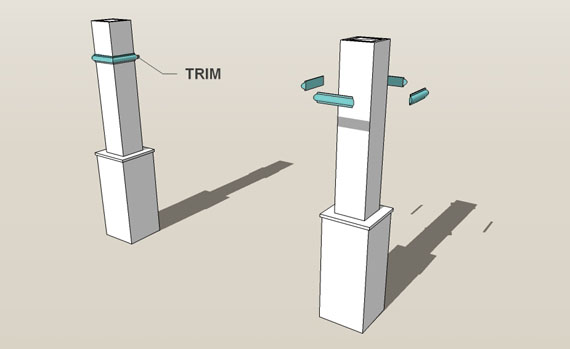
How We Built Our Custom Newel Posts; Tutorial
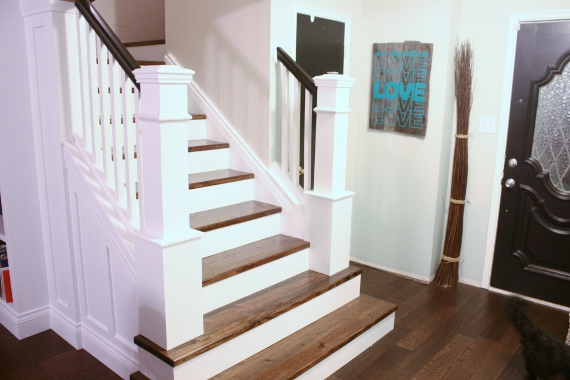
Okay guys, as you know (or I hope you do) we love to amp up the style in our home with architectural elements. So, when it comes to our stair project the newel posts were a really important feature. I wanted big and chunky- no skinny “model sized” newel posts for me- give me some meat!


Tools I used for this project:
- Table Saw
- Miter Saw
- Circular Saw
- Orbital Sander
- Nail Gun
- Calking Gun
- Wood Glue
Lessons learned:
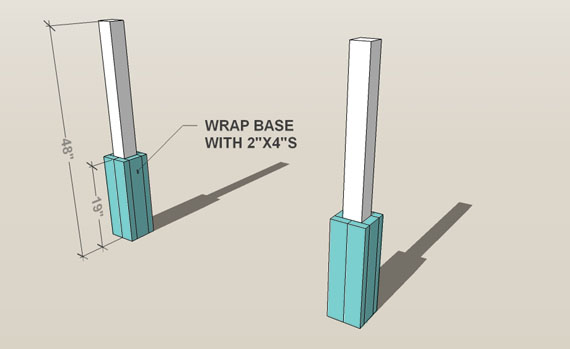
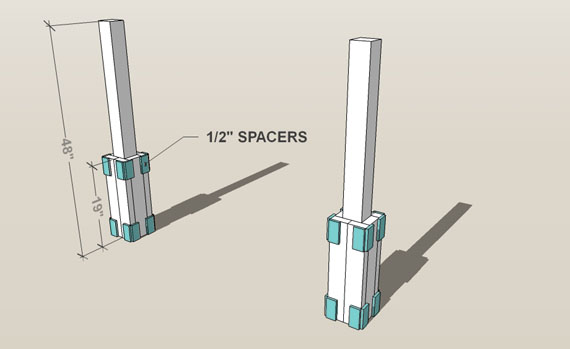
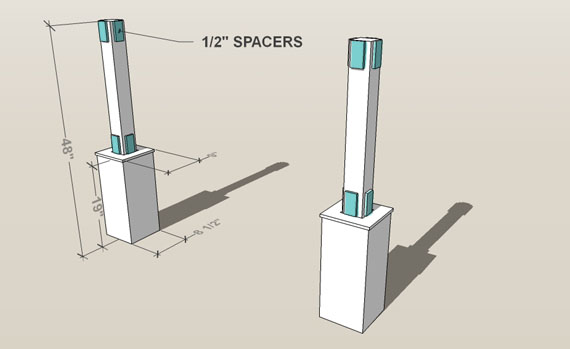
- Don’t use pressure treated 4×4’s for the core- whoops! We thought we would save $10 by buying it, but regret using it. They shrank and twisted. Justin was able to work around it but it took a lot of thought and patience. That is one reason that I used the spacers, but mine were all different sizes to make the shell of it all be centered and square.
- Don’t wait too lang to install your new newel posts. They add so much to the end of the stairs and are great to look at rather than what we looked at for 2 years!
In case you want to follow along, check out these posts too:
post 1: Starting the project!
post 2 : Demo & Rebuilding
post 3: More Rebuilding
post 4 : Filling the gaps
post 5 : Walnut Stain… at last!
post 6 : Adding the Stair Risers, Finishing the Runners
Post 7 : Custom Built Newel Posts

Remodelaholic is written by Cassity and Justin. Cassity has a degree in interior design and Justin is a landscape architect, so we adore everything that makes up a HOME! We love to share home remodeling ideas and projects we’re working on. From huge kitchen renovation ideas to small bathroom remodels, there isn’t anything we won’t try to tackle (at least once!). We are in the midst of our third whole home renovation, (check out house 1 and house 2 as well, so there should be a lot more inspiration coming your way. We hope that you will stop by often for home design inspiration, tutorials, interior design tips, delicious recipes and what going on in our family life.


Thanks so much for taking the time to draw up these plans! I have dreams of making over our ugly 1970’s staircase, and would love to have newel posts like these. This makes me think that maybe, just maybe I could do it!
I am so glad! GOOD LUCK! You can totally do it!
Cassity
Cassity, I am trying to find your kitchen cabinet headboard tutorial but it’s not here. Can you please let me know where I can find that? Thanks so much! You two are so very talented.!!!!
Here is the post, good luck! :https://www.remodelaholic.com/2010/03/head-of-the-board-headboard-tutorial/
i have been wanting to do this EXACT project at our house but couldn’t find pictures to show my handyman until i found your blog! our stairs are almost identical to what yours were before you made them over. i just linked to your blog from mine: https://patrickandmer.blogspot.com/2012/04/take-good-look.html
yea! Good luck! If you do it please send me a link!
Cass
Wow, this looks amazing!! We bought an older home with stairs the former owner do-it-yourselfer installed and I wondered how in the world to match the walls going up as their wood along both walls doesn’t match and is odd looking, one side thick to the top the other side thin half way up(???!!!) So with your ideas I now know what to do!! My friend already talked me into buying wood risers(they are just plywood)… So now to show hubby photos of your project with the trim on top (and his handy skills) I will have a pretty staircase too!! Thanks for sharing!!! My ugly stairs will soon be transformed too, yay
LOVE your entry!!! LOVE the tutorial and professionally done images!!! You guys are awesome!
Thanks for such a detailed tutorial! It looks amazing.
Hello, new follower here! I would love to have you link up with my Clever Chicks Blog Hop this week!
https://www.the-chicken-chick.com/2012/09/clever-chicks-blog-hop-2-featured-post.html
I hope to see you there!
Cheers!
Kathy
The Chicken Chick
Hello Cassity
I want to feature this post in a story I am working on for Houselogic. I sent you an email too. Can you please shoot me an email? I have a few questions, thanks!
Email has been sent!
Cassity, I really like your Newel post as well as all of the Architectural details in your house. Do you mind giving me an estimate of the cost to build just one of those newel posts?
Ayisha, It really wasn’t too expensive. We cut down a 4 x 8 sheet of MDF for the sides $30 (it will cover both newel posts), you need the 4×4 posts $10 buck each and the cap (in the fencing isle) around $15.00 for both and just about 6 feet of little molding for a little added detail… and you’re done (besides caulk, paint and nail hole filler)
So you could do this project for about $60-80 dollars!
Thank you so much for the inspiration! We’ve been researching the best (and cheapest) way to remodel our 20 year old stairwell for over 1 year now. We are scared to death to mess it up, but here we go! Your tutorial is simply amazing, and now we’re ready to tackle the project! I’ll be sure to send you pics of before & after. Best wishes :).
Yes! Please send me pictures I would love to see what you are working on! GOOD LUCK!
Hey, kids! Wondering how you did the long miter cuts? I have a table saw, but it doesn’t tilt to cut long miters, so I’m not sure how to get those nice mitered corners on the MDF. Thanks!
Derek, we did use our table saw, since it has the ability to tilt the blade. If you don’t have that function on your saw, you could always do a butted edge I would just have the front be a full piece and the back be a full piece. The sides will just need to be shortened to, the current width minus 2 x the width of the MDF you are using. Also you could add a panel like this newel post that my friend did in her home.
Hello again! So, while waiting for the conditioner to set on my new barndoor baby gates, (Thank you again!), I decided to play around on your site. I am so excited! As soon as I finish staining and hanging my new gorgeous baby doors, building a coordinating sliding barn door for the other kitchen opening, and building that cool shoe storage shelf, I am going to do the exact same thing to my stairs! Believe it or not, our stairs, (pre-remodel for you), are nearly identical! There are three differences though. One, mine are swapped, we have a door to the left of our stairs. Two, we only have two stairs past said door. Three, our treads are not cheap pine, they are cheaper plywood! So, I will be painting them gloss black! I will not be discouraged!
My concern is that darn door so close to the foot of the stairs. We have only 7.5 inches between the edge of the stair and the edge of the moulding. Do you know how far past the newel post the lowest stair protrudes? Do you have measurements for the stairs posted somewhere? Thank you for another great inspiration and tutorial!
Amy, sounds like you are really busy. That is great that you are making all of that. About the stairs, I don’t have the measurements, but it looks to be about 11-12″ past the newel post. I hope that helps.
Thank you so much for posting this, I am so hopeful that my husband might actually be able to give me this in our new house!!! You guys are amazing!
Thank you Kerry and good luck with your new home!
Beautiful! Can you tell me how you mounted the newels to the stairs?
Kelly, you can see in this post here, how I did it. Make sure not to use pressure treated wood for the 4×4 post. I did and it warped. Just keep that in mind.
I just love this transformation! You are a couple of geniuses over there 🙂 We recently redid our stairs and I had to use your staircase as an example before he would agree that we could do it ourselves. We didn’t have a stair skirt either and instead had carpet where it should be (yup, up the wall!) Thanks for the inspiration! I would love to link back to your page when I write the post about our staircase remodel!
Thanks for the nice comment. We would love a link back when you write about yours.
The transformation is stunning! When we did our staircase remodel, I had to show my husband your tutorial before he would jump on board 🙂 I’m hoping to write a post about what we did soon, and would love to link back to yours to showcase our inspiration! Thanks again for yet another awesome tutorial! Your blog never disappoints!!
Thanks for the nice comment. You can absolutely link back to us.
First let me say…y’all have done a fabulous job! Want to come to my house and fix my stairs for me? Kidding…kind of! 🙂 Just a quick question, on the newel post plans what are the dimensions for your base cap (I can’t read the number no matter how hard I squint at my screen), and was that something you purchase precut and if not how did you cut the square out of the middle?? Thanks!
Kara it is a pre cut post cap for a 6×6 post.
I’ll be doing this over the weekend. Going to go with a different look. I have put raised panels on the walls at 4 ft all over the house. So I am going to go with a square insert here. Hopefully it turns out.
Josh, good luck with the project. Let us know how it turned out.
This is gorje! I do have a question about your banister: did you refinish your original banister or buy a new one? And what change in it did you make – I can’t tell for sure, but it looks like you painted it black, is that correct?
Yes, we just painted the handle black and gave original spindles a coat of white paint. That was it!
I am from Guyana, South America. I love this idea, but it is for an external freestanding stair. I am a bit worried about the banister. I will have to make two. Any ideas on how to accomplish the S shape to accommodate the wider bottom to the narrower top. The rain will not be too kind on the joints. Thank you.
Is the base cap mdf? Is it something you cut or did you but it premade?